If you’re Finishing or Remodeling your basement, there’s one topic that always comes up sooner than later: the basement egress window. It’s about safety, yes—but it’s also about comfort, natural light, and passing inspection without headaches. If you live in Salt Lake County, Davis County, or Utah County, this guide from Utah Basement Finishing breaks down what you need to know, in plain language, so you can plan confidently and build a basement you actually love spending time in.
Contents
- 1 Why egress Windows matter more than people think
- 2 What counts as an egress window? Let me explain
- 3 Utah-specific notes: codes, permits, and who to ask
- 4 Window wells that work in real life
- 5 Bedrooms vs. Living Rooms: when is an egress window required?
- 6 Measuring the opening correctly: the number that counts
- 7 Structure and waterproofing: the less flashy, more critical stuff
- 8 How a typical egress window install flows
- 9 Costs, timeline, and what to expect along the Wasatch Front
- 10 Common mistakes—and how to avoid them
- 11 Design ideas so the well doesn’t look like a bunker
- 12 DIY or hire a pro? A straight answer
- 13 Quick FAQ for Utah homeowners
- 14 Ready to talk through your basement?
Why egress Windows matter more than people think
Most folks hear “egress” and think it’s just another code box to check. Here’s the thing: egress is about giving people a way out, fast, in an emergency. If a fire blocks the Stairs, that window becomes the exit. That’s not dramatic—that’s practical. And if someone sleeps down there, it’s not optional. It’s required.
There’s more. An egress window lets in daylight that changes how a basement feels. Rooms go from cave-like to calm and livable. Appraisers notice, buyers notice, and so do your own shoulders when they finally drop because the space feels open. You know what? The right egress window installation can even make a basement bedroom feel like a proper suite, not an afterthought.
What counts as an egress window? Let me explain
Utah follows the International Residential Code (IRC) with state and local amendments. While your city’s version may vary slightly, most jurisdictions along the Wasatch Front use a similar set of minimums. This is the heart of the egress window code—the numbers inspectors look for.
| Requirement | Minimum | Notes for Utah homeowners |
|---|---|---|
| Clear opening size | At least 5.7 sq. ft. (5.0 sq. ft. at grade) | Clear opening means the usable opening when the window is fully open, not the glass size. |
| Opening height | At least 24 inches | Height and width must work together to reach the 5.7 sq. ft. minimum. |
| Opening width | At least 20 inches | A 20 by 24 opening alone isn’t big enough; the total opening still needs 5.7 sq. ft. |
| Sill height | No more than 44 inches from floor | If it’s higher, you’ll need a permanent step or lowered floor area. |
| Window well size | 36 x 36 inches minimum (clear dimension) | If the well depth exceeds 44 inches, a ladder or steps are required. |
| Well ladder/steps | Ladder at least 12 inches wide; rungs 18 inches max spacing | Must be usable with the window fully open. No tools required to use any covers. |
If you remember nothing else, remember this: the inspector measures the clear opening—the space someone can crawl through, with the window fully open. That number makes or breaks approval.
Utah-specific notes: codes, permits, and who to ask
Each city or county in our area enforces its own version of the IRC and may have local amendments. Most of Salt Lake County, Davis County, and Utah County follow the IRC closely, but plan review requirements and submittals can differ. When there’s any doubt, we confirm with your local building department before work begins.
Expect a permit, a concrete cut plan, and sometimes engineering for the header supporting the new opening. We handle those pieces for our clients, but if you’re researching DIY paths, we recommend checking your city’s building department web page or calling the counter. A five-minute call can save a week of delays.
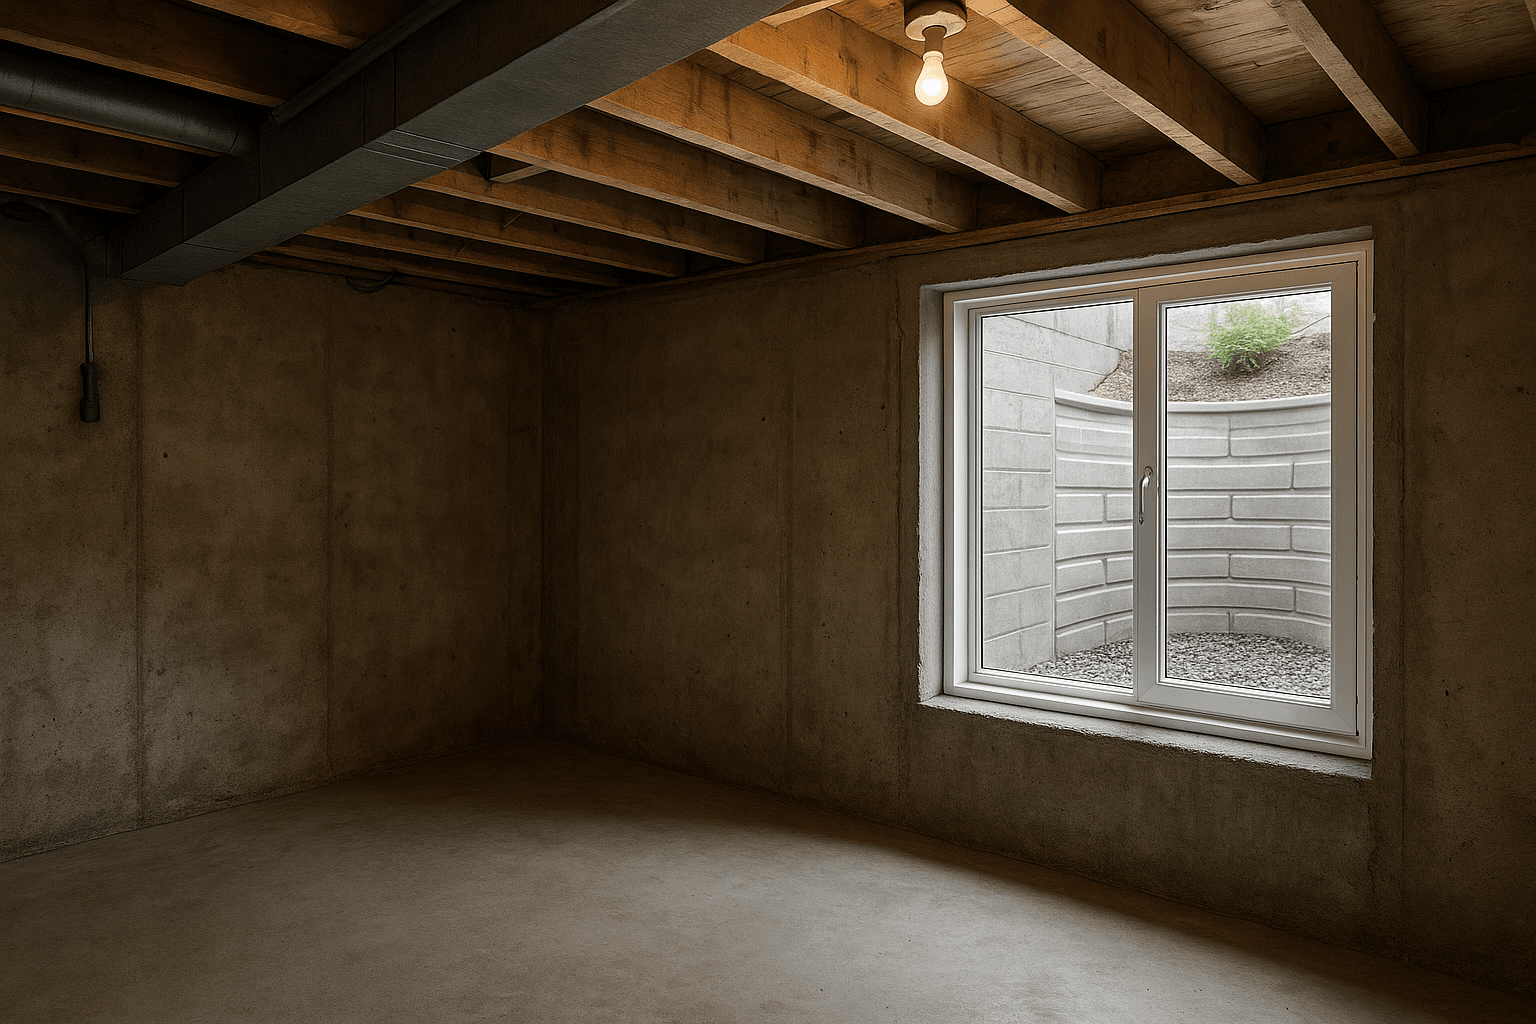
Window wells that work in real life
If your egress window sits below grade, you’ll need a window well. That well needs to be big enough for someone to climb out easily—and it must stay dry. Along the Wasatch Front, spring runoff and clay-heavy soils can turn a shallow bowl into a seasonal pond if you don’t plan drainage right.
- Size and clearance: Minimum 36 inches clear from the wall to the well face, and at least 36 inches wide. More space helps with real-life climbing, especially for kids.
- Ladder or steps: If the well depth is over 44 inches, add a ladder. Built-in steps are fine if they meet code. The ladder must be accessible with the window open.
- Drainage matters: We add a gravel base, drain tile, and tie-ins to an existing perimeter drain or sump when needed. A dry well is a happy well.
- Covers and grates: A cover keeps out snow, leaves, and accidental missteps. It must open from the inside without keys or tools. Clear polycarbonate covers bring daylight while keeping storm slush out.
- Brands that hold up: We regularly install RockWell, Bilco, and Wellcraft systems for durability and clean looks.
One more Utah note: snow slides off roofs and can pile up fast. A properly pitched cover and good drainage prevent a surprise ice dam right at your escape route.
Bedrooms vs. Living Rooms: when is an egress window required?
Any basement sleeping room needs an egress window or a door directly to the outside. Finished basements that don’t include bedrooms still need an emergency escape and rescue opening if the space is considered habitable and doesn’t already have a door to the exterior. If you’ve got a walkout basement with a standard exterior door, that may meet the requirement for the area it serves.
In practice, most homeowners put one egress window in a future bedroom location. If you plan to add a second bedroom later, consider placing a second egress window now while the concrete saw is already onsite; it can be kinder to your budget and your landscaping.
Measuring the opening correctly: the number that counts
We can’t stress this enough: the clear opening is what the inspector cares about. Casement windows are very popular because the entire sash swings clear and gives you a bigger opening for the same wall cut. Sliders can work too, but the moving panel takes up space and sometimes fails the math unless you go bigger.
Here’s a simple rule of thumb: aim for a casement with a clear opening of 20 to 24 inches wide and 35 to 40 inches tall, depending on the manufacturer’s specs. We verify with cut sheets before we cut concrete. Sill height also matters—keep it at 44 inches or less above the finished floor. If your current foundation forces a higher sill, we can lower the interior floor at the window or add a permanent step.
Structure and waterproofing: the less flashy, more critical stuff
Cutting a foundation wall isn’t like framing a new interior door. We’re dealing with loads, reinforcement, and moisture. That means a structural header or lintel sized to carry the load above the opening, proper rebar treatment, and clean, sealed cuts.
- Engineering the opening: We size the header based on wall thickness, span, and what’s above—grade, deck, or a stacked shear wall. When needed, we bring in a Utah-licensed structural engineer for signed calculations.
- Cutting concrete safely: We use wet saws, core drills, and dust control. Outside cuts protect your interior air quality and keep the mess outside whenever possible.
- Waterproofing and flashing: We integrate peel-and-stick membranes, pan flashing, and sealants with the existing foundation waterproofing. The goal is a watertight system, not just a sealed window.
- Drainage tie-ins: If the lot drains poorly or we see clay, we add a drain line from the well to a perimeter drain or sump. It’s cheap insurance against that one big storm.
Honestly, this quiet part of the work—done right—prevents 90 percent of callbacks.
How a typical egress window install flows
Our baseline process at Utah Basement Finishing
Every project is a little different, but you’ll recognize the rhythm:
- 1. Site visit and layout: We find the best wall, verify setbacks and utilities, and mark the cut so you can visualize the finished look.
- 2. Permits and engineering: We prepare drawings, submit permits, and coordinate any engineering. You’ll know who’s inspecting and when.
- 3. Excavation and protection: We dig the well footprint, protect landscaping where possible, and stage materials so access stays clear.
- 4. Foundation cut and header: Concrete is cut, the opening is removed, and a structural header or lintel is installed per plan.
- 5. Window set and flashing: The unit is installed plumb and level, with pan flashing, side membranes, and proper fasteners.
- 6. Well, ladder, and drainage: We set the well, add gravel and drain connections, and install a code-compliant ladder or steps.
- 7. Trim and finish: Interior casing and sill, exterior sealant, and a well cover that opens easily from inside.
- 8. Inspection: Final walkthrough, inspection, and a simple care guide so you know how to keep things dry and easy to operate.
Let me explain why this order matters: each step protects the next. A tight install starts with accurate layout and ends with clean drainage. Skipping ahead usually costs time later.
Costs, timeline, and what to expect along the Wasatch Front
We know you’re wondering about price. For a straightforward basement egress window installation with a well, ladder, and cover, most homeowners in Salt Lake County, Davis County, and Utah County see totals in the mid-to-upper four figures. Heavier structural work, large window sizes, or tricky access can push it higher. We’re happy to give a written Estimate after we see your site, because the soil, foundation thickness, and water history all matter.
Timeline-wise, design and permitting can take a couple of weeks depending on your city’s queue. Actual on-site work often wraps in a few days once we’re digging. Winter installs are absolutely doable—just expect more attention to thawed ground, temporary heat, and keeping snow out of the well. Spring fills our schedule fast, so a little planning goes a long way.
Common mistakes—and how to avoid them
- Measuring the wrong thing: Ordering a window by rough opening and forgetting the clear opening requirement. Always check the manufacturer’s egress data.
- Under-sizing the well: A narrow well makes climbing clumsy and fails inspection. 36 inches is the minimum; more space feels better.
- Skipping drainage: No gravel base or drain line? That well turns into a bird bath after the first storm.
- Ignoring sill height: A sill over 44 inches needs a permanent step. Not a stool. Not a box. A built-in step.
- Adding security Bars: Bars or grates cannot reduce the opening or require keys to remove. If you need security, choose rated covers that open from inside.
- Forgetting tempered glass near grade: Most egress windows close to the floor or doorways need tempered glass for safety. Check your plan set.
Little details make or break approval. The good news? They’re predictable. We design around them from day one.
Design ideas so the well doesn’t look like a bunker
An egress well can be more than a hole with a ladder. You can soften the view and brighten the room without sacrificing safety.
- Textured well walls: Faux stone wells from RockWell or Wellcraft look warm and reflect light better than bare galvanized steel.
- Clean covers: Clear covers bring daylight and keep out snow. Pair with low-voltage well lighting for cozy evenings.
- Landscaping accents: River rock, native grasses, and a tidy border blend the well into your yard. Keep plants clear of the cover so it opens freely.
- Interior finishes: A deeper wood sill, wide casing, and a light paint color bounce sunshine around the room.
It’s a safety feature, yes, but it can also be a light well that changes the mood of the entire basement.
DIY or hire a pro? A straight answer
If you’re comfortable with concrete saws, shoring, waterproofing, and code inspections, DIY might be on the table. You’ll need tools like an SDS-max rotary hammer, a wet-cut concrete saw, a core drill, and the right membranes and flashing. You’ll also want a tight plan for hauling concrete safely and protecting utilities.
Most homeowners prefer a professional team because of the structural and waterproofing risks. A leak-free installation and a code-compliant clear opening are the payoffs. Plus, we handle permits, inspections, and warranty. We’re biased, sure—but we’ve also been called in to fix projects that went sideways. It’s stressful and usually more expensive than doing it right once.
Quick FAQ for Utah homeowners
- Do I need an egress window for every basement room? Bedrooms require egress; other habitable areas may need an escape opening unless there’s a direct exterior door.
- Can I use security bars? Only if they don’t reduce the opening and can be opened from inside without keys or tools.
- What about window well covers? Great for safety and snow control. They must be operable from inside with no special effort.
- Is tempered glass required? Often yes near floors or doors. We confirm with your plan reviewer and the manufacturer’s specs.
- What inspections should I expect? Typically rough opening/structure, and final egress and safety checks. Some cities combine them.
- Which window type is easiest to pass? Casements usually provide the largest clear opening for a given size.
- Does Utah use the IRC? Yes, with amendments that vary by city. We verify local rules in Salt Lake, Davis, and Utah counties before we build.
One friendly note: this guide is general information. Always confirm your project with your local building department or your inspector. We’re happy to do that legwork.
Ready to talk through your basement?
If you’re planning a basement bedroom or a full remodel, we can design and install a code-compliant basement egress window that looks great and keeps your space dry. Call 801-515-3473 or click Request a Free Quote to get friendly, straightforward help from Utah Basement Finishing.
We serve homeowners across Salt Lake County, Davis County, and Utah County—and we’ll handle the permits, the engineering, and the heavy lifting. Quick scheduling, clean installs, and no runaround. 801-515-3473 | Request a Free Quote