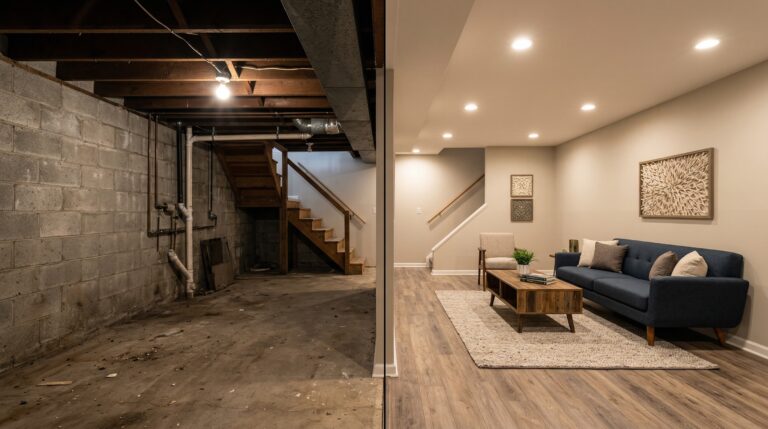
Nothing sells a basement finishing project like seeing the actual transformation. These are real scenarios Utah homeowners face — the dark, unfinished spaces they start with and the finished rooms they end up loving.
- 1Transformation 1: The Family Entertainment Hub
- 2Transformation 2: The Rental Income Basement
- 3Transformation 3: The Home Office Conversion
- 4Transformation 4: The Luxury Entertainment Basement
- 5Transformation 5: The Budget-Smart Starter Finish
- 6Common Patterns Across All Projects
- 7Plan Your Transformation
Transformation 1: The Family Entertainment Hub
Before
A 1,400 sq ft unfinished basement in a Sandy home built in 2005. Bare concrete floor, exposed framing, dangling wires, a single bulb lighting the whole space. Used for storing holiday decorations and forgotten exercise equipment. Spider webs in every corner. The family of five had outgrown the upstairs and needed room to spread out.
The Plan
- Open-concept family room with home theater wall
- Full bathroom with walk-in shower
- Wet bar with beverage fridge and seating for four
- Play area for kids with built-in storage
- One bedroom with egress window
After
The transformation is night and day. LVP flooring throughout in a warm oak tone. A 75-inch TV mounted on a stone accent wall with surround sound built into the ceiling. The wet bar features quartz countertops, shaker cabinets, and pendant lighting. The bathroom has floor-to-ceiling tile with a frameless glass shower door. Recessed LED lighting throughout makes it bright without feeling clinical.
By the Numbers
- Cost: $62,000
- Timeline: 7 weeks
- Added home value: Estimated $40,000-$45,000
- Finish level: Mid-range
Key Lesson
The homeowners initially wanted carpet but switched to LVP after learning about moisture risks in Utah basements. Two years later, zero regrets — especially with kids and a wet bar in the same space.
Transformation 2: The Rental Income Basement
Before
An 1,100 sq ft basement in a Layton split-level. Partially finished in the 1990s with dated wood paneling, stained carpet, and a half bath with a toilet and pedestal sink from another era. A single egress window that barely met code. The ceiling was low at 7’6″ — standard for the era but claustrophobic with the dark paneling.
The Plan
- Full gut and remodel to create a legal basement apartment
- New kitchen with full appliances
- Updated bathroom with tub/shower combo
- Bedroom with new code-compliant egress window
- Living area with separate entrance
- Independent utility hookups where possible
After
The wood paneling is gone, replaced with smooth drywall in a bright warm white. The low ceiling gets recessed LED lights (no hanging fixtures eating headroom) painted the same color as walls to maximize the sense of height. New LVP flooring makes the whole space feel modern. The kitchen has white cabinets, butcher block counters, and full-size appliances. A new oversized egress window floods the bedroom with light.
By the Numbers
- Cost: $78,000 (full gut + kitchen + new egress)
- Timeline: 10 weeks
- Monthly rental income: $1,200
- Payback period: 5.4 years
- Finish level: Mid-range with upgraded kitchen
Key Lesson
The partial finish from the 90s actually cost more to gut than starting from scratch would have. Removing old paneling, outdated wiring, and non-code-compliant framing added time and cost. Sometimes ripping it all out is the right move.
Transformation 3: The Home Office Conversion
Before
A 900 sq ft unfinished basement in a Cottonwood Heights home. The owner had been working remotely from a corner of the master bedroom for two years. The basement had good ceiling height (9 feet), existing plumbing rough-ins, and two small basement windows. It was insulated but unfinished — just pink fiberglass visible between studs.
The Plan
- Dedicated home office with built-in desk and shelving
- Video call background wall (intentionally designed to look professional on camera)
- Half bathroom
- Small lounge area for breaks
- Soundproofing between basement ceiling and main floor
After
The office space features a built-in walnut desk spanning 8 feet with integrated cable management and USB outlets. Behind the desk chair, a designed “Zoom wall” with floating shelves, a plant ledge, and strategic lighting creates a professional video background. Acoustic panels in the ceiling and sound-dampening insulation in all walls mean calls don’t disturb the family. The half bath saves trips upstairs. A small sitting area with a couch and coffee table provides a mental break space.
By the Numbers
- Cost: $38,000
- Timeline: 5 weeks
- Tax benefit: Portion deductible as home office (consult your CPA)
- Finish level: Mid-range with custom built-ins
Key Lesson
Investing in soundproofing was the single best decision. Without it, every footstep upstairs would have been audible on video calls. The $3,000 spent on proper sound isolation pays for itself in professionalism daily.
Transformation 4: The Luxury Entertainment Basement
Before
A 2,200 sq ft basement in a Draper hillside home with walkout potential. Completely unfinished except for a roughed-in bathroom (drain and supply lines in the slab). High ceilings at 9’6″. Three small basement windows plus the walkout wall opportunity. The homeowners had been in the house 8 years and finally decided it was time.
The Plan
- Walkout patio with glass door system
- Dedicated home theater room (separate from main space)
- Full bar with kegerator, dishwasher, and ice maker
- Master-quality bathroom with heated floors
- Exercise room with rubber flooring
- Open living area connecting all spaces
After
The walkout wall features a 16-foot multi-slide glass door that opens completely to a covered flagstone patio. The theater room has a 120-inch screen, 4K projector, acoustic panels, reclining theater seats for 8, and a star ceiling. The bar is the centerpiece: waterfall-edge quartz, custom cabinetry, three taps, and seating for six. Heated tile floors in the bathroom with a rainfall shower and freestanding tub. The gym has commercial rubber flooring, mirrored walls, and a mounted TV.
By the Numbers
- Cost: $145,000
- Timeline: 14 weeks
- Added home value: Estimated $90,000-$100,000
- Finish level: High-end
Key Lesson
The walkout conversion was worth every penny. The glass doors transform the entire basement’s feel — it doesn’t read as a basement at all. Natural light reaches deep into the space and the indoor-outdoor flow is the feature everyone comments on first.
Transformation 5: The Budget-Smart Starter Finish
Before
An 800 sq ft basement in an Eagle Mountain newer build (2019). The builder left it unfinished with stubbed plumbing for a future bathroom, pre-wired electrical, and good ceiling height. The homeowners — a young couple with their first baby — had a limited budget but needed the space.
The Plan
- Open family room / play area
- One bedroom with egress window (already roughed in)
- Full bathroom using existing rough-ins
- Basic finishes, no custom work
- DIY-friendly where possible (painting, trim)
After
Clean, bright, and functional. The family room has carpet (budget choice — fine in a dry Utah basement with proper moisture barrier), neutral paint, and basic recessed lighting. The bathroom has a simple tub/shower combo with ceramic tile surround, vanity from a home improvement store, and LVP flooring. The bedroom has the egress window, carpet, and a ceiling fan. Nothing fancy, but everything is done right — proper insulation, vapor barriers, and code-compliant electrical.
By the Numbers
- Cost: $28,000
- Timeline: 5 weeks
- Finish level: Basic
- Cost per square foot: $35
Key Lesson
Pre-existing rough-ins saved roughly $8,000. If your builder offered plumbing and electrical rough-ins when your home was built, using them is significantly cheaper than starting from scratch. Even if you can’t finish the basement right away, those rough-ins pay dividends later.
Common Patterns Across All Projects
What Drives Cost Up
- Plumbing — Every bathroom, wet bar, or kitchen adds $5,000-$15,000
- Egress windows — $3,000-$6,000 each, but required for bedrooms
- Custom work — Built-in shelving, millwork, and unique features add up
- Finish level — The jump from basic to high-end is 2-3x in materials cost
- Gut remodels — Removing old work costs more than starting fresh
What Stays Consistent
- Timeline — About 1 week per $10,000 spent is a rough rule of thumb
- Permits — Every project needed them. Budget $500-$2,000 and 1-3 weeks processing
- ROI — All projects added estimated value equal to 60-70% of cost
- Regret items — Zero homeowners regretted doing it. Several regretted waiting
Utah-Specific Takeaways
- LVP flooring outperforms carpet in basements, even in Utah’s dry climate
- Egress windows add light and value beyond just code compliance
- Proper insulation is critical — Utah winters demand it
- Spring moisture checks before starting prevent surprises mid-project
Plan Your Transformation
Every finished basement starts as an unfinished one. Use our cost calculator to estimate your project, then get a free in-home quote to start your own before-and-after story.
Call 801-515-3473 to discuss your project today.
Ready to Start Your Basement Project?
Get a free, no-obligation quote from Utah's trusted basement finishing experts.
Get Free Quote