Utah is arid. Average humidity hovers around 30-50%. So why do Utah basements have moisture problems?
Because moisture in basements doesn’t come from the air — it comes from the ground. And Utah’s soil, snowmelt patterns, and construction practices create specific moisture challenges you need to understand before finishing your basement.
Common Causes of Basement Moisture in Utah
1. Spring Snowmelt
The biggest moisture event for Utah basements happens every March through May. Snowpack melts, saturates the soil around your foundation, and hydrostatic pressure pushes water through any crack, gap, or pore in the concrete. Even homes that are bone-dry all summer can have wet basements during snowmelt.
High-risk areas: Homes on the east bench in any valley (closer to mountains with deeper snowpack), homes at the base of slopes, and homes in areas where neighboring properties’ drainage flows toward your foundation.
2. Clay Soil
Large portions of the Salt Lake Valley, Utah Valley, and Weber County sit on clay-heavy soil. Clay expands when wet and contracts when dry. This expansion pushes against foundation walls (lateral pressure) and the contraction creates gaps where water flows freely.
Clay also holds water rather than draining it. After rain or snowmelt, clay soil acts like a sponge pressed against your foundation — slowly releasing moisture for weeks.
3. Poor Grading
The ground around your foundation should slope away from the house at a minimum 6 inches of drop over the first 10 feet. Many Utah homes, especially after years of landscaping changes, settling, and erosion, have flat or even negative grading — ground that slopes toward the foundation.
4. Gutter and Downspout Issues
Gutters that overflow, downspouts that dump water directly at the foundation, or missing gutter sections create concentrated water flow right where you don’t want it. One disconnected downspout can dump hundreds of gallons of water against your foundation during a single storm.
5. High Water Table
Parts of the Salt Lake Valley (particularly near the Jordan River, in the northwest valley, and in low-lying areas) have seasonally high water tables. When the water table rises in spring, hydrostatic pressure pushes moisture up through the basement slab.
6. Irrigation Over-Spray
This is a Utah-specific classic. Sprinkler systems that spray against the foundation or flood flower beds next to the house put enormous amounts of water directly against the basement walls. It’s the most common — and most easily fixable — cause of basement moisture in Utah.
7. Foundation Cracks
All concrete cracks. It’s a matter of when, not if. Hairline cracks are normal and rarely cause problems. But cracks wider than 1/8 inch, or cracks that are actively leaking, need attention. In Utah, freeze-thaw cycles widen cracks over time as water enters, freezes, expands, and opens the crack further.
Warning Signs to Watch For
Obvious Signs
- Standing water on the floor after rain or snowmelt
- Water stains on walls or floor (brown or yellow discoloration)
- Efflorescence — white, powdery mineral deposits on concrete walls (salts left behind as water evaporates)
- Visible mold — black, green, or white fuzzy growth on walls, floor, or stored items
- Musty smell — even without visible mold, a persistent damp smell indicates excess moisture
Subtle Signs
- Peeling paint on foundation walls — moisture pushing through from behind
- Damp feeling — walls or floor feel cool and clammy to the touch
- Condensation on pipes — cold water pipes sweating indicates high humidity levels in the basement
- Rust on metal items — stored tools, furniture legs, or appliance feet showing rust
- Warped wood — stored furniture or door frames showing moisture damage
- Higher-than-expected humidity — a cheap hygrometer reading consistently above 60% indicates a moisture source
The Plastic Sheet Test
Before finishing your basement, do this test:
1. Tape a 2×2 foot piece of clear plastic sheeting to the concrete floor
2. Tape another piece to the concrete wall
3. Seal all edges with tape
4. Wait 48-72 hours
5. Check for moisture droplets on the underside of the plastic (between plastic and concrete)
If you see moisture: you have a water vapor issue that must be addressed before finishing. If the plastic is dry, you’re likely clear for finishing with standard moisture precautions.
Solutions by Problem Type
Exterior Solutions (Fix the Source)
Grade correction ($500-$3,000):
Regrade the soil around your foundation to slope away from the house. The minimum is 6 inches of drop over 10 feet. This is often the single most effective fix.
Gutter repair/extension ($200-$1,000):
Clean gutters, repair leaks, and extend downspouts at least 6 feet from the foundation. Underground downspout extensions that drain to a pop-up emitter in the yard are the cleanest solution.
Sprinkler adjustment ($0-$200):
Redirect any sprinkler heads that spray within 3 feet of the foundation. Reduce watering frequency on beds adjacent to the house. This is free to fix and eliminates a massive moisture source.
Exterior waterproofing ($5,000-$15,000+):
Excavate around the foundation, apply waterproof membrane, and install or repair foundation drain tile. This is the nuclear option — expensive but definitive. Typically only needed for serious chronic water intrusion.
Window well drainage ($300-$800 per well):
Add or improve gravel drainage in egress window wells. Connect to the perimeter drain or install a dedicated drain line.
Interior Solutions (Manage What Gets Through)
Interior French drain system ($3,000-$8,000):
A perforated drain pipe installed along the interior perimeter of the basement, below the slab level, connected to a sump pump. This collects water that enters through walls or floor and removes it before it becomes a problem.
Sump pump ($500-$2,000 installed):
If you have or install an interior drain system, a sump pump is the exit point. Battery backup sump pumps ($300-$600 extra) keep working during power outages — which often coincide with heavy storms.
Crack injection ($200-$800 per crack):
Epoxy or polyurethane injection seals foundation cracks from inside. Effective for isolated cracks but doesn’t address broader moisture issues.
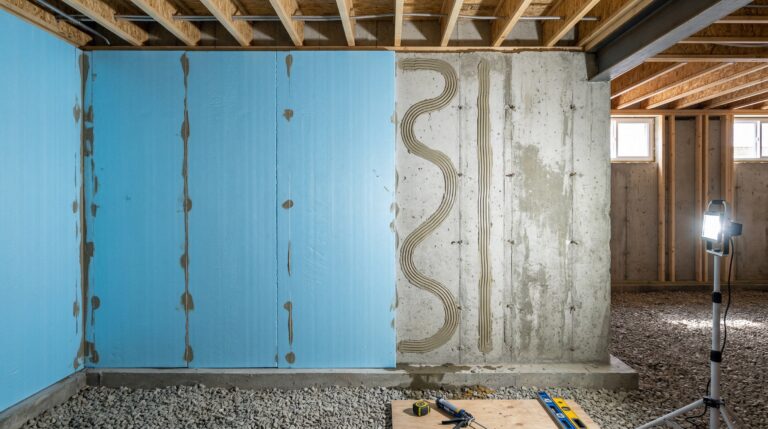
Vapor barrier on walls ($1,000-$3,000):
A dimple membrane or sealed rigid foam applied to foundation walls before framing. This creates a drainage plane — any moisture that comes through the concrete drains down to the perimeter drain instead of entering the living space.
Dehumidifier ($200-$600):
Manages humidity levels in finished basements. Not a solution for liquid water intrusion, but keeps humidity below 50% to prevent mold. Utah’s dry climate means dehumidifiers are less critical here than in humid states, but they’re useful during spring.
Radon Mitigation ($800-$1,500)
While not a moisture issue, radon is a related below-grade concern. The same pathways that allow moisture (cracks, gaps, porous concrete) also allow radon gas. A sub-slab depressurization system addresses both by creating negative pressure under the slab, preventing both radon and moisture vapor from entering.
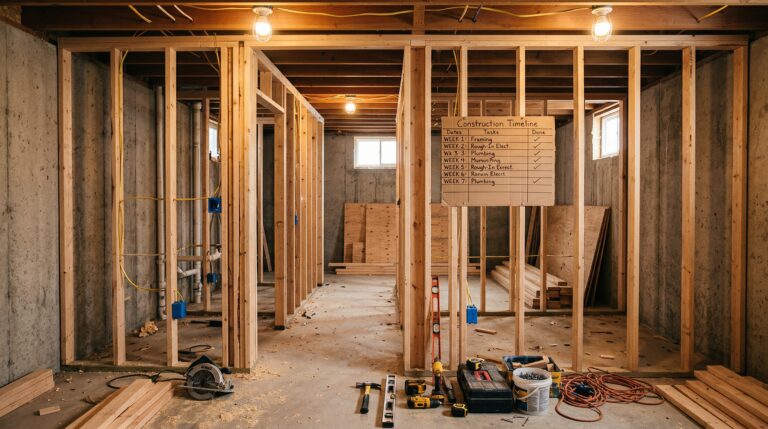
Before You Finish: A Moisture Protocol
- Test first — Do the plastic sheet test on floor and walls. Test for radon.
- Fix exterior issues — Grading, gutters, sprinklers. These are cheap and effective.
- Monitor for one full season — Ideally through spring snowmelt. A basement that’s dry in August may be wet in April.
- Address any interior water — French drain, sump pump, crack repairs as needed.
- Use proper wall assembly — Rigid foam or closed-cell spray foam against foundation walls (acts as both insulation and vapor barrier). See our insulation guide.
- Choose moisture-resistant materials — LVP or tile flooring (not carpet on concrete), moisture-resistant drywall in wet areas, pressure-treated bottom plates.
What Happens If You Skip Moisture Mitigation
Finishing a basement with unresolved moisture problems leads to:
– Mold growth behind drywall — Hidden but actively affecting air quality
– Musty odors that permeate the finished space
– Warping and buckling of flooring, especially carpet and laminate
– Drywall damage — bubbling, staining, crumbling
– Complete redo — tearing out finished walls to address what should have been fixed first
The cost to tear out and refinish a water-damaged basement is 2-3x the cost of doing moisture mitigation properly from the start.
Utah Resources
- Blue Stakes (811): Call before digging for any exterior drainage work
- Utah Geological Survey: Soil type and groundwater data for your area
- Your city’s building department: Specific requirements for waterproofing and drainage
- Radon testing: Utah DEQ provides information on radon zones
Get Expert Assessment
Not sure if your basement has moisture issues? Our team does pre-construction moisture assessments as part of every basement finishing project. We identify problems and fix them before a single wall goes up.
Schedule a free consultation or call 801-515-3473.
Ready to Start Your Basement Project?
Get a free, no-obligation quote from Utah's trusted basement finishing experts.
Get Free Quote